Showing posts with label DIY Projects. Show all posts

Wednesday, August 6, 2014

Wedding DIY

Ok I know I am pretty late for Wedding Wednesday, but hey! It's still Wednesday. That's a win for me right?

Obviously I have been super busy lately, but I thought I'd share with you some of the DIY things we are doing for the wedding. These are 100 percent just ideas and thoughts of how things will look, but definitely not the final product! Very rough drafts guys!

First,  I worked with my mom's friend who is a florist and we came up with an idea for our centerpieces.  I love the birdcage look and found some awesome deals at Michaels on them.  We worked together to decide how to fill them with flowers (babys breath, hydrangea and garden roses), so this is an idea of what we came up with. Each table will have several mercury votives and candles as well.

For the aisles at the ceremony, I just wanted big chunks of baby's breath. I love the look of it and wanted a lot of it.  We came up with something like this to put on every other chair.  My dress is tulle (eeek!) so this ties in nicely with that.


Next, we have decided to do a popcorn table for our guests as something fun.  We will have large baskets of popcorn as well as several baskets filled with additions like M&Ms, marshmallows and peanuts. I also ordered 10 different kinds of popcorn seasonings!  We decided to open this up during the cocktail hour, so people could munch while they waited.  Bonus, it saves us $1,500 since we don't have to buy appetizers for everyone!


The DIY in it all are the 4 stands for some of the smaller baskets.  I put C to work and I think what he created came out wonderful!

They will be gold...and yes that is Bachelorette Andi crying in the background!
 Next, it was my dream to have those lovely sparkly tablecloths that I've seen on pinterest, so I decided to make it happen.   The fabric is not cheap ($12+ per yard) and it's not easy to find (I've seen it at stores in the LA Fashion district and on one place online) but I was successful.  I'm going able to make two full length tablecloths for our sweetheart table and our cake table for less than the price it will cost me to purchase one from etsy! Win! 

My (sideways) color samples...
 Here is a sneak peek of what it will look like:


Finally, instead of buying a fancy garter or two from etsy ($25+), I decided to see what I could do on my own.  This week I set to work with some ribbon, fabric and a glue gun and this is what I came up with.  The green is a nod to Michigan State for C and I plan to add tiny a MSU charm as well!


I know these aren't the greatest photos, but I wanted to give you guys a look into what is going on behind the scenes!  Soon I will let you know about some of the items we opted to purchase instead of make :)
Image and video hosting by TinyPic

Monday, January 27, 2014

Hand Painted Logos

For Christmas this year I decided to get crafty.  I have several friends who are huge fans of different sports teams, so I thought I would create something around that.

After spending some time thinking about it I decided to hand paint the logos on a canvas.  Today I thought I would show them off!
 
I have actually started selling these recently. Each one takes a couple of hours and some are more difficult than others, but I thought $20 was a fair price (which includes the paint and 12x12 canvas purchase).


Several of C's fans have ordered his team logo and I have several other orders that have come in. I am really excited to work on these more!

If you'd like one, let me know!  I can do any logo for any sport :) 

Image and video hosting by TinyPic


Wednesday, January 15, 2014

How to Transfer a Single MAC Eyeshadow to a Palette


When I was in high school I became addicted to buying MAC makeup.  Actually, it was their eye shadow to be exact.  I loved going into the store and picking out a new color from their lineup. I would stand there for what seemed like forever testing all of the colors on my hand before deciding which one was going to come home with me.

When I started to dabble in some modeling in college, I noticed that a lot of the makeup artists had palettes of MAC eye shadow.  They seriously looked awesome.  I wished I could put all of the single shadows that I had into one of their palettes, but I was told you have to buy them that way.  

I found out you can buy the eye shadows as refills which don’t have the outside plastic casing and then buy an empty palette that holds 15 refills to put them all in. Each refill has a magnet at the bottom as does the case, so that’s how they stick in there.

The problem was, by that time, I had over 45 single shadows in their big ole plastic cases!

Then one day, I met the greatest makeup artist ever.  She told me she had started with a bunch of singles too and had figured out a way to get them all into palettes. Que the Hallelujahs! I was so excited.

She taught me how to do it and after perfecting it….I thought I would teach you all how to go from this:

To this:


You will need:
MAC Eyeshadow
Lighter
Safety Pin
Magnet Tape
Scissors

(I did this to two different shadows and chose the best pic from each. C helped.....how nice of him)

Step 1: Slide a safety pin in the tiny crack along the front of the top part of the shadow case (once its open). Sometimes it takes a little work, but you should be able to jimmy it in there.
Step 2:  Once you get the safety pin in, you should be able to pop the two pieces apart and separate them.

Step 3: Take a lighter and hold it under the bottom of the shadow plate to warm it up. I do think for a good 15-25 seconds. It slightly singes the bottom of the plastic, but you don't need to worry about that. What you are really doing here is loosening the glue that is keeping the two pieces together.
Step 4: Once it is good and warm, take a safety pin  and gently slide it along the outside of the metal part to loosen it. Gently try to stick the pin under the metal piece and pry it up.  Be careful with this, is you are too harsh, the shadow will crack and you will have a mess!

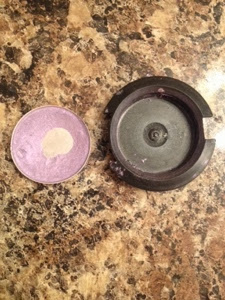
Step 5:  Pop out the metal piece with shadow in tact!
Step 6: Cut a piece of magnet tape the size of the metal piece and stick it on the bottom. 
Step 7: Place into palette!
Voila! Now you have your very own MAC palette :)

I took the time to label the lids of my palettes so I would know what the names of the shadows were in case I wanted to purchase refills (which clearly I need to do). Now, obviously, when I go into MAC I don’t purchase the single plastic containers, I purchase the refills.  They are actually $5 cheaper.  Can you imagine how much I could have saved had I known this a long time ago?!?

Hope I at least help a few of you out!
Image and video hosting by TinyPic


Saturday, July 6, 2013

Currently

Hello my fabulous friends!  For the weekend I thought I'd give you some things I am currently up to!

Reading: Bossypants by Tina Fey and Captivating by John and Staci Eldridge.  Bossypants is quite funny.  This is actually my first time reading something on the Kindle and I don't hate it.  My brother gave me a Kindle for my birthday way back in February and I've been skeptical. I thought I'd hate it because I am such a fan of paper books, but its actually really convenient.  I am kind of loving it!  Any suggestions for my next read?

Working out:  Ok you all know how much I hate working out, but I decided to try something that sounded pretty easy. The 30 day squat challenge.  Has anyone done this? I started right before vacation which was a really bad idea because I think the first few days were the worst!  I could barely sit down with out yelping and there were a surprising amount of stairs on my vacation! I took a picture of my back side before I started to see if there is any difference when I am done. I will share my results at the end, but sorry guys, definitely no pictures!

Crafting: C is gone all this weekend so my plan is to surprise him with this when he gets home! We really need a small side table in the living room, so I thought this would be a fun cheap way of doing it.  I figured I would just use two crates and make it shorter.  I think I am going to do two tables and them someday if we decide we want a shelf instead, we can just screw them all together!  This will be perfect to stack all of my books on as well.


Watching:  I think I am going to indulge in some girly movies this weekend. C left early Friday morning and gets back late afternoon on Sunday (boo).  I plan on renting Safe Haven for sure (I finished the book a few months ago).  Any other recommendations?

Missing:  This handsome face :(


What do you guys have planned for the weekend??

Image and video hosting by TinyPic

Tuesday, April 16, 2013

Who Needs Pinterest?

So up until C and I moved to the new apartment we didn't have an actual bed....just a mattress on the floor.  Lame right?  I felt like I was living in some dude's college dorm haha. I decided when we moved that I would do something about it!  I created my own custom headboard....without the help of pinterest!


I went to a store we have here that sells old and/or used furniture from major hotels like Holiday Inn and Marriott.  First, I picked out a metal frame for our king sized bed.  Mattress off the flooe? Check! Next my mom and I searched around until I found a headboard I liked. It was $30.  I brought it home and went to work!


All of the furniture in our place is black, so I knew I wanted to paint it.  First I primed it.  I decided not to paint the back since no one would see it, so I just primed the edges and the front.  Then I had to wait 24 hours before I could paint again.


Next, I did two coats of the black.  This took a little while because I had to wait 24 hours in between coats.  I also had to wait until someone was available to help me move it, because let me tell you, that darn thing was heavy! I think it was solid oak. I decided I wanted to do fabric panels in the big rectangle areas, so I chose not to paint that part.  I wasn't sure how I'd attach the panels, so I didn't want to paint the whole thing. I didn't want to end up attaching something and then pulling up the panels and having an uneven paint splotch mess.


Next, I gathered up supplies for the panels.  I used cardboard I found laying around the house, some quilting batting (make sure its batting, not stuffing), a glue gun and a stapler.  Oh and this awesome fabric I had found that looks like leather....but is much cheaper and softer!


I glued the batting on the front of the cardboard, then covered it with the fabric.  I flipped over the panel and glued the fabric down on the back.  It wasn't tight at all, so I decided to use a basic stapler to pull the fabric tighter and attach it. Gotta use what you got!


 Next I attached the panels to the headboard.  I was going to velcro them down so I could easily switch them out if I wanted, but ultimately decided to just nail them down. I put a teeny tiny nail in each of the four corners. You can barely see them in the picture, but they are white.  It's all I could find at the time.  I ended up painting the top of each nail with a tiny drop of black paint to hide them.


Next was the hardest part....I added nail head trim. That stuff isn't too cheap....but thankfully I had a couple of 50% off coupons for JoAnn Fabrics. I cut the trim into strips (one for each side) and then nailed them down.  It was very difficult to get straight, so you just have to go slowly.  I only gently nailed them in at first so I could adjust if I needed to, then I pounded that stuff in!  I still didn't get the bottom completely straight (thats the side I did last) but I figured it would be covered by the bed and/or pillows anyways.


Here's the final product! I love how it turned out and I am so proud of it. I think I spent about $75 on the entire thing from start to finish.  Not too shabby for a custom headboard!  I didn't look at pinterest (or any other site for that matter) once.  I just came up with this in my head and figured out a way to do it :)


Here it is up in our bedroom.  This is a terrible picture because the room has terrible lighting.  We have one lamp on one side table.  Geez thanks furniture rental company.  Maybe that should be my next task....creating my own side tables!


LinkWithin

Related Posts Plugin for WordPress, Blogger...